 Experts In Your Home knows there are certain household jobs that can fill you with pride and accomplishment.
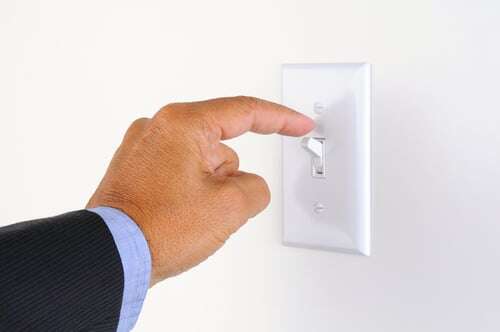
Replacing a light switch is one of those jobs, and it's the subject of this, the latest in a series of articles on basic, do-it-yourself electrical repairs that are now appearing on our company blog.
Replacing a single-pole light switch—or one that controls a light from one location—may sound like a job for a licensed local electrician, and it should be if you're in any way unsure of your ability to carry it out.
But trust us when we say we're presenting this topic (and others like it) because we believe that if you read our instructions carefully, take your time and check your work along the way, you can master this electrical repair, thereby saving you money on repair bills and perhaps causing your buttons to burst with pride at the same time.
For this electrical repair, you will need:
- Electrical tape
- Pliers
- Screwdrivers (Phillips and long-nosed)
- Switch
- Voltage tester
- Wire stripper
To begin this electrical repair, turn off power at the switch. Then turn off the power to the switch at the fuse box. Remove the wall plate with a screwdriver, but take the extra step of verifying that the power is off by using the voltage tester. (Yes, we take safety very seriously at Experts In Your Home).
Now you're ready to:
- Remove the screws that mount the switch to the wall box and pull out the switch. (If you live in an older home, don't be surprised if the box is dusty or even filled with cobwebs. Be sure to vacuum the box before proceeding). Look for loose or broken wires, which would explain why the switch isn't working. Remove all the wires and trim the exposed copper. If the wires are bunched up in the back of the box, cut the wires as much as you can.
- Remove the insulation from the three wires—black, white and copper—until about 1 inch of the copper is visible. Bend the ends of the wires into the shape of a small hook, so that they resemble the top of a candy cane. The top of the hooks should be snug enough to fit around a terminal screw.
- Connect the wires to the new switch in a series of steps: Unscrew the terminal screws of the new switch. Connect the black wire to the brass terminal screw, the white wire to the other brass terminal screw and the copper ground wire to the green ground screw by wrapping the wires in a clockwise direction on top of the screws. Squeeze the ends of the wires tightly around each screw with the long-nosed pliers. Tighten the screw terminals.
- Wrap the wires and terminals with electrical tape, just to be on the safe side (always a good place to be).
- Gently push the switch into the wall box, bending the wires carefully as you do so. Install the mounting screws to latch the switch to the wall box.
- Install the wall plate and turn on the power before testing the switch.
- Enthusiastically pronounce, “There shall be light.”
You can skip the last step if you really want to, but we know there's nothing like sharing your sense of pride and accomplishment with those around you. Just remember that if you encounter questions or problems as you proceed with electrical repairs or need a Chico area electrician, Experts In Your Home is here to help you (pardon the pun) see the light.
Related Articles:
DIY Electrical Repair: How to Safely Change a Lightbulb
DIY Electrical Repairs: How to Repair an Extension Cord Plug
For a list of electrical jobs that aren't safe to DIY, download the FREE Guide below:
.jpg)
.jpg)