 If you're turning to an article about how to replace a hard-wired smoke detector, then you've already taken a huge step toward ensuring your family's safety against fire by practicing safe electrical repair or replacement on your smoke detector.
At least two-thirds of all home fire deaths occur in homes without working smoke detectors, according to the United States Fire Administration. And we've probably all heard the news of such a sad, tragic death and thought, “That didn't have to happen!”
It won't in your home because 1.) You're being proactive and 2.) Experts In Your Home is devoting this installment in our ongoing series of do-it-yourself electrical repair to the vital topic of replacing a hard-wired smoke detector.
What about those easy-to-install detectors that you can install with adhesive or screws? While it's true that a purely battery-operated smoke detector is better than no smoke detector at all, the fact is that a smoke detector that is hard-wired to your home's electrical system is a superior choice because of several inherent benefits:
- Interconnectivity, which allows multiple detectors in your home to be linked together so that if one goes off, they will all go off.
- Back-up capability through a battery – an important feature to have in case of a power loss. (If a battery-only detector fails, there is no such backup.)
- Longevity, meaning that the alarm will sound until you physically turn it off. You may never use this feature – or it might end up saving your home, especially if the alarm sounds and continues to blare while nobody is home. The idea here is, the alarm will eventually come to the attention of someone (such as a neighbor) who will respond.
Both types of smoke detectors should be tested monthly by pressing the “alarm” button. Smoke detectors should be replaced about every eight years.
If the time for you to do so is now, be sure that you have enough smoke detectors to protect your home. Install them:
- On the ceiling on each level of your home, including the basement and garage
- Within 10 feet of the master bedroom and in the hallway that leads to other bedrooms
- Away from drafts, such as windows and vents, which could interfere with the operation
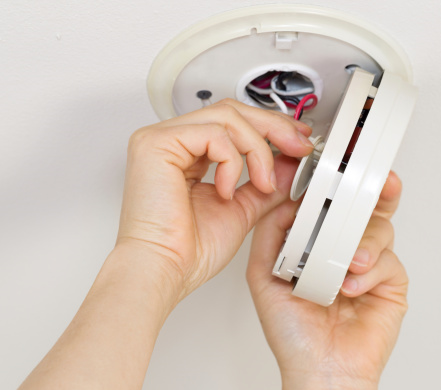
When you're ready to get started replacing a smoke detector, be sure to turn the power off at your home's electrical panel and:
- Unscrew the mounting plate of the smoke detector and remove the old smoke detector by following the arrows on the detector
- Check that the power is indeed off with a voltage tester
- Note how the wires are connected; one should be connected to another of the same color. If not, make a diagram so that you can connect the new smoke detector in the same way. The third wire – either orange or red – is the “interconnect” wire.
- Screw the detector to the wall and push the “test” button. With three connected wires, all the alarms in your home should sound simultaneously.
As experience has taught us, sometimes a smoke detector requires you to connect a solid wire to a so-called “stranded wire, which looks like a small bundle of wires. Unfortunately, a wire connector doesn't always “grab” the stranded wire as it should.
To secure the connection, strip the insulation from the stranded wire so that it's about 1/8 inch longer than the solid wire. Twist the ends together and cap the wires with a wire connector.
That should eliminate any “surprises” you might find, but don't hesitate to reach out to Experts In Your Home if you encounter other hitches as you protect your family and home against the devastation of fire, or need help with any other kind of electrical repair. Our Chico, CA electricians are ready to help you out.
Related Articles:
Tools to Have on Hand for Home Electrical Repairs
9 Tips for Preventing Electrical Fires When Doing Electrical Repairs
Stay safer and find out which electrical jobs should be left to the pros by downloading this FREE guide today:

